# Platform
# Manage Your Account
his page is divided into the following:
1. My Profile
2. Subscriptions
***
### **My Profile:**
Click on the profile icon and select the **My Profile** option from the drop-down. You will be able to view your basic details here.
***
### **Subscriptions:**
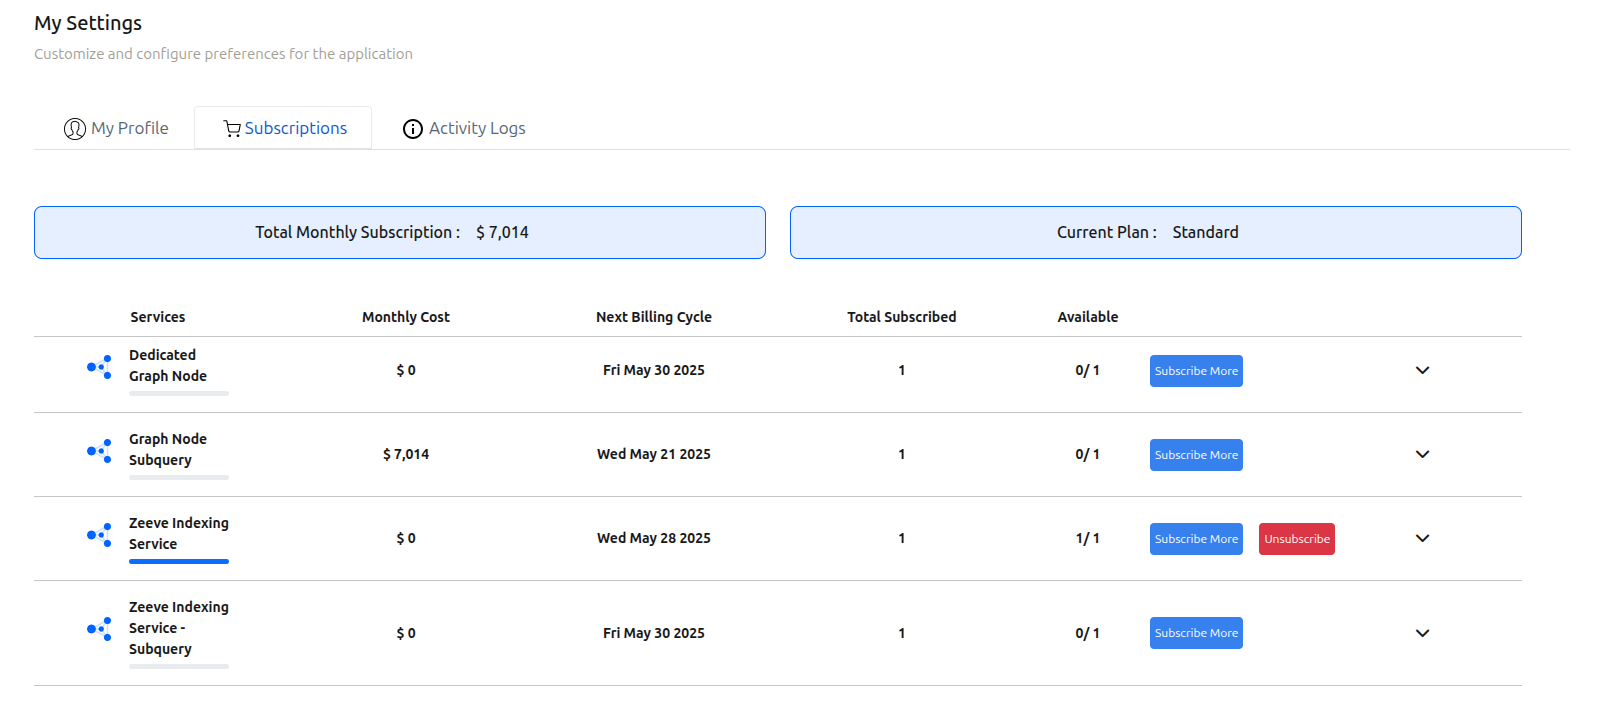
In the subscription section, you can view the list of all your subscriptions.
* **Services:** The service to which you have subscribed.
* **Monthly cost:** This indicates the monthly recurring cost of your subscription.
* **Next Billing Cycle:** This indicates the next billing date for your subscription.
* **Total subscribed:** This indicates the quantity of individual items you have purchased with the subscription.
* **Available:** This number indicates the quantity available for each item associated with the subscription. This number will increase or decrease according to the consumption of the subscription item.\
This will help you keep track of your consumption, which will help you modify your subscription as per your needs.
* **Subscribe More:** This will help you to upgrade or downgrade your subscription as required.
* **Unsubscribe:** This will allow you to unsubscribe from a particular subscription.
# Technical Support
Stuck anywhere? Need help with anything? Want clarification? Want to pour in your suggestions? Want to raise feature requests? We are easily reachable and are all ears, eyes, and minds for you on the following channels :
**Email Us:** You can shoot an email to us at [support@zeeve.io](mailto:support@zeeve.io).
# Services
# Shared Indexing
Traceye combines its most reliable enterprise-grade infrastructure with The Graph’s data indexing protocol to provide an easy, predictable, and smooth experience for using subgraphs and subquery.
Traceye's Subgraphs and Subquery remove the complexity of extracting and processing data from archive nodes and deliver intuitive UI for Web3 developers to filter and query data efficiently. When you deploy a subgraph and subquery and configure the query criteria, all successful hits are indexed, and the results are stored in a PostgreSQL database. A GraphQL endpoint is created that you can use to access the most recent data from your subgraph and subquery, synchronized to the latest block. Coupled with Traceye elastic archive nodes, Traceye Subgraphs and Subquery is the most powerful blockchain data indexing solution available. It provides extremely fast sync times and near-zero latency to keep your subgraphs and subquery at the latest block. Enterprise-grade infrastructure reliability and support will ensure you get the best of the data indexing with Traceye.
Shared Indexers Offerings on our platform -
* [**Hosted Subgraphs**-](/services/shared-indexing/hosted-subgraphs) Whether you want to deploy a new subgraph or migrate an existing hosted subgraph, you can use our shared Indexers with simple per-subgraph pricing to get started in minutes.
* [**Hosted Subquery** -](/services/shared-indexing/hosted-subquery) Whether you want to deploy a new subquery , you can use our shared Indexers with simple per-subquery pricing to get started in minutes.
# Hosted Subgraphs
# Quick Start Guide
Creating and deploying a subgraph on the Traceye platform to index data from supported networks like **Avalanche Fuji, Ethereum Goerli, Ethereum, and a custom network** requires several steps. Here's a general guide to help you get started:
**Prerequisites**: Before you begin, make sure you have the following prerequisites:
* An account on the [Traceye Platform](https://app.traceye.io/account/login).
* Familiarity with Graph Protocol and the subgraph creation process.
* Access to the blockchain network you want to index (Avalanche Fuji, Ethereum Goerli, Ethereum, or a custom network).
# Purchase Subscription
Follow these steps to purchase a subscription:
**Step1: Register/Login** - Create a new account or log in to the existing account on the [Traceye Platform](https://app.traceye.io/account/login)
**Step 2: Navigate to Purchase Page -** Navigate to the [Hosted Subgraphs](https://app.traceye.io/subgraph/dashboard) purchase page by clicking on **Hosted Subgraphs** present in the **SHARED INDEXING** section from the left navigation panel and then clicking on the **Buy Subgraphs** button at the top.
**Step 3: Enter Quantity** - Provide the number of Subgraphs, Community Subgraphs, Webhooks, additional API units and additional storage units that you want to purchase. Then, click on the **Buy Now** button to proceed.
**Step 4: Make Payment** - On the payment page, enter your card details and click on **Subscribe** to make payment.
#### Congratulations 🎉 !!! You have successfully purchased your subscription.
# Manage Hosted Subgraphs
In [Hosted Subgraphs](https://app.traceye.io/subgraph/dashboard), you can view a list of all existing subgraphs and create a new subgraph using the Create Subgraph button. Click on a subgraph to open the subgraph details. The subgraph details include information such as the Creation date, Blockchain Network, and Workspace. You can view the subgraph Deployment Command and the Subgraph Query URL.
### Monitor your subgraph status
The status of a subgraph is displayed on the subgraph detail page. The status will be one of the following:
* **Not deployed** — this status is displayed when you create a subgraph but have not yet deployed a subgraph.
* **Deployed** — the subgraph is in the process of being deployed and is syncing data.
### Work with Subgraphs:
**Step 1: Register/Login** - Create a new account or log in to your existing account on the [Traceye Platform](https://app.traceye.io/account/login)
**Step 2: Navigate to Hosted Subgraphs** - Click on the **Hosted Subgraphs** in the **SHARED INDEXING** section on the Left navigation panel.
**Step 3:** You will be redirected to the **Subgraph Dashboard** screen to view a list of all existing subgraphs.
**Step 4:** Click on the **Create Subgraph** button at the top right of the screen, after which you will be redirected to the Create Subgraph screen.
**Step 5:** Enter valid Details of the subgraph and Click on the **Add Subgraph** button. After successful authentication, you can create a subgraph and be redirected to the details page.
**Step 6:** The subgraph details page includes information such as the **Creation date, Blockchain Network, and Workspace**. You can view the **API units consumed** and other request metadata. Also, you can view the **Subgraph Query URL** and the **Subgraph Deployment Command**, which you are required to deploy the subgraph.
**Step 7:** The subgraph details page includes information such as the **latest** and **current** block Sync Status.
**Step 8:** Click on the **Query URL** to trace all successful hits. The results are stored in a PostgreSQL database.
# Webhook
# Settings
## Manage Settings
**Step 1: Register/Login** - Create a new account or log in to your existing account on the [Traceye Platform](https://app.traceye.io/account/login).
**Step 2: Navigate to Hosted Subgraphs** - Click on the **Hosted Subgraphs** in the **SHARED INDEXING** section on the Left navigation panel.
**Step 3:** You will be redirected to the **Subgraph Dashboard** screen to view a list of all existing subgraphs.
**Step 4:** Select a subgraph to navigate to its details page, then click on the **Settings** tab. This section displays all your configured settings.
Step 5: To apply new settings, adjust them as needed and then click **Save** Button to confirm your changes.
## Setting Types
### Notifications
Subgraph notifications are a pivotal feature for users who rely on subgraph data for their applications or analyses. These notifications are designed to inform users about significant changes and milestones in the lifecycle of a subgraph, enhancing the overall user experience by ensuring critical updates are timely communicated. Here are the main scenarios where notifications are triggered:
#### Subgraph Status
Notifications are sent out once the status of a subgraph changes to 'Healthy', 'Unhealthy', or 'Failed'. This feature is crucial for maintaining the reliability and performance of applications that depend on subgraph data.
#### Completely Synced
Notifications are sent out once a subgraph has fully synced with the blockchain. This ensures that users are aware of when the data from a subgraph is up to date and reflects the latest state of the blockchain.\_
#### Query Ready
Notifications are sent out once the subgraph are ready to be queried, ensuring that they can leverage the latest data and information immediately.
Implementing these notifications helps users monitor their subgraphs effectively, reducing the need for manual checks and enabling more efficient management of their applications or data analyses.
{% hint style="info" %}
You will receive notifications both in-app and via email.
{% endhint %}
# Hosted SubQuery
Hosted SubQuery is a fully managed service that simplifies the indexing and querying of blockchain data, removing the need for complex infrastructure management. With Hosted SubQuery, you can quickly retrieve on-chain data and integrate it into decentralized applications (dApps), analytics tools, or research projects. The platform offers a scalable, high-performance environment, allowing you to focus on application logic rather than handling data processing.
By providing a flexible and user-friendly interface, Hosted SubQuery streamlines the process of querying blockchain data through GraphQL, making it accessible to both small-scale community projects and enterprise-grade solutions. This service is particularly useful for tracking blockchain events, querying historical data, or building powerful data-driven features. With custom RPC endpoints provided by users, Hosted SubQuery supports indexing tailored to each project's specific needs.
# Quick Start Guide
Hosted SubQuery supports a wide range of blockchains, grouped into several major network families. Each network family includes various blockchains, and users can provide their custom RPC to configure and add subqueries accordingly. The supported network families and example blockchains includes
#### EVM
Supported Blockchains: Custom EVM RPC, Ethereum, Holesky, Gnosis, Polygon, Fantom, Binance, Optimism, Avalanche.
#### Polkadot
Supported Blockchain: Custom Polkadot RPC.
#### Cosmos
Supported Blockchain: Custom Cosmos RPC.
#### NEAR
Supported Blockchain: Custom NEAR RPC.
#### Algorand
Supported Blockchain: Custom Algorand RPC.
#### Concordium
Supported Blockchain: Custom Concordium RPC.
#### Stellar
Supported Blockchain: Custom Stellar RPC.
**Prerequisites**: Before you begin, make sure you have the following prerequisites:
* An account on the [Traceye Platform](https://app.traceye.io/account/login).
* Familiarity with the subQuery creation process.
# Purchase Subscription
Follow these steps to purchase a subscription:
**Step1: Register/Login** - Create a new account or log in to the existing account on the [Traceye Platform](https://app.traceye.io/account/login)
**Step 2: Navigate to Purchase Page -** Navigate to the [Hosted SubQuery](https://app.traceye.io/subgraph/shared-subquery) purchase page by clicking on **Hosted SubQuery** present in the **SHARED INDEXING** section from the left navigation pane and then clicking on the **Buy Subscription** button at the top.
**Step 3: Enter Quantity** - Provide the number of Subqueries, additional API units and additional storage units that you want to purchase. Then, click on the **Buy Now** button to proceed.
**Step 4: Make Payment** - On the payment page, enter your card details and click on **Subscribe** to make payment.
#### Congratulations 🎉 !!! You have successfully purchased your subscription.
# Manage Hosted SubQuery
In [Hosted SubQuery](https://app.traceye.io/subgraph/shared-subquery), you can view a list of all existing subqueries and create a new subQuery using the **Add SubQuery** button. Click on a subQuery to open the subQuery details. The subQuery details include information such as the Blockchain Family, Blockchain Network, RPC Endpoint and Creation date. You can view the subQuery **Deployment Command** and the subQuery **Query URL**.
### Monitor your subQuery status
The status of a subQuery is displayed on the subQuery detail page. The status will be one of the following:
* **Not deployed** — this status is displayed when you create a subQuery but have not yet deployed a subQuery.
* **In Progress** — the subQuery is in the process of being deployed.
* **Failed** — the subQuery deployment is failed.
* **Deployed** — the subQuery is being deployed and is syncing data.
### Work with SubQuery:
**Step 1: Register/Login** - Create a new account or log in to your existing account on the [Traceye Platform](https://app.traceye.io/account/login).
**Step 2: Navigate to Hosted SubQuery** - Click on the **Hosted SubQuery** in the **SHARED INDEXING** section on the Left navigation panel.
**Step 3:** You will be redirected to the **SubQuery Dashboard** screen to view a list of all existing subqueries.
**Step 4:** Click on the **Add SubQuery** button at the top right of the screen, after which you will be redirected to the Create SubQuery screen.
**Step 5:** Enter valid Details of the subQuery and Click on the **Add SubQuery** button. After successful validation, you can create a subQuery and be redirected to the details page.
**Step 6:** The subQuery details page includes information such as the **Blockchain Family**, **Blockchain** **Network**, **RPC Endpoint** and **Creation date**. You can view the **API units consumed** and other request metadata. Also, you can view the **SubQuery Query URL** and the **SubQuery Deployment Command**, which you are required to deploy the subQuery.
**Step 7:** After the subQuery is deployed, Status will change from “**Not deployed**” to “**Deployed**” and the subQuery will start indexing. They will be able to see the **Sync Status**, **Request Data** and **Query URL**
**Step 8:** Query URL section provides the URL which will be used to make GraphQL queries. Click on the button on top to access GraphQL playground.
**Step 9:** Click on the **Log** button of any deployed subQuery to get real-time status information about the progress of the sync.
**Step 10:** Click on the “**Entities**” tab of the deployed subQuery to view the entities associated with the subQuery.
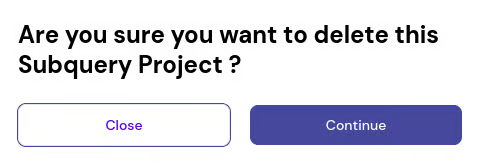
**Step 11:** Click on the **Delete** button to delete a subQuery. Your subQuery is deleted, and you return to the [Hosted SubQuery](https://app.traceye.io/subgraph/shared-subquery) dashboard page. Then click on **Continue** to authorize the deletion.
# Settings
Manage Settings
**Step 1: Register/Login** - Create a new account or log in to your existing account on the[ ](https://app.zeeve.io/auth/signup)[Traceye Platform](https://app.traceye.io/account/login).
**Step 2: Navigate to Hosted SubQuery** - Click on the **Hosted SubQuery** in the **SHARED INDEXING** section on the Left navigation panel.
**Step 3:** You will be redirected to the **Hosted** **SubQuery Dashboard** screen to view a list of all existing subqueries.
**Step 4:** Select a subQuery to navigate to its details page, then click on the **Settings** tab. This section displays all your configured settings.
Step 5: To apply new settings, adjust them as needed and then click **Save** Button to confirm your changes.
## Setting Types
### Notifications
SubQuery notifications are a pivotal feature for users who rely on subQuery data for their applications or analyses. These notifications are designed to inform users about significant changes and milestones in the lifecycle of a subQuery, enhancing the overall user experience by ensuring critical updates are timely communicated. Here are the main scenarios where notifications are triggered:
#### SubQuery Status
Notifications are sent out once the status of a subQuery changes to 'Healthy', 'Unhealthy', or 'Failed'. This feature is crucial for maintaining the reliability and performance of applications that depend on subQuery data.
#### Completely Synced
Notifications are sent out once a subQuery has fully synced with the blockchain. This ensures that users are aware of when the data from a subQuery is up to date and reflects the latest state of the blockchain.
#### Query Ready
Notifications are sent out once the subQuery are ready to be queried, ensuring that they can leverage the latest data and information immediately.
Implementing these notifications helps users monitor their subquerieseffectively, reducing the need for manual checks and enabling more efficient management of their applications or data analyses.
{% hint style="info" %}
You will receive notifications both in-app and via email.
{% endhint %}
# Dedicated Indexing
Traceye combines its most reliable enterprise-grade infrastructure with The Graph’s data indexing protocol to provide an easy, predictable, and smooth experience for using subgraphs and subquery.
Traceye's Subgraphs and Subquery remove the complexity of extracting and processing data from archive nodes and deliver intuitive UI for Web3 developers to filter and query data efficiently. When you deploy a subgraph and subquery and configure the query criteria, all successful hits are indexed, and the results are stored in a PostgreSQL database. A GraphQL endpoint is created that you can use to access the most recent data from your subgraph and subquery, synchronized to the latest block. Coupled with Traceye elastic archive nodes, Traceye Subgraphs and Subquery is the most powerful blockchain data indexing solution available. It provides extremely fast sync times and near-zero latency to keep your subgraphs and subquery at the latest block. Enterprise-grade infrastructure reliability and support will ensure you get the best of the data indexing with Traceye.
Dedicated Indexers Offerings on our platform -
* [Graph Nodes-](/services/dedicated-indexing/graph-nodes) If you require dedicated infrastructure to deploy a new subgraph or migrate an existing hosted subgraph, you can use our dedicated Indexers with simple per-graph-node pricing to get started in minutes.
* [Subquery Nodes](/services/dedicated-indexing/subquery-nodes)- If you require dedicated infrastructure to deploy a new subquery, you can use our dedicated Indexers with simple per-subquery-node pricing to get started in minutes.
# Graph Nodes
# Quick Start Guide
# Purchase Subscription
Follow these steps to purchase a subscription:
**Step1: Register/Login** - Create a new account or log in to the existing account on the [Traceye Platform](https://app.traceye.io/account/login)
**Step 2: Navigate to Purchase Page -** Navigate to the [Graph Nodes](https://app.traceye.io/subgraph/graph-node) purchase page by clicking on **Graph Nodes** present in the **DEDICATED INDEXING** section from the left navigation pane and then clicking on the **Buy Subscription** button at the top.
**Step 3: Enter Quantity** - Provide the number of Nodes and Addons that you want to purchase. Then, click on the **Buy Now** button to proceed.
**Step 4: Make Payment** - On the payment page, enter your card details and click on **Subscribe** to make payment.
### Congratulations :tada: !!! You have successfully purchased your subscription.
# Graph Node Manual
On the detail page of your node, you will be able to see all the relevant details of your node.
You can access the following on the node page,
* Basic Information
* Analytics Dashboard \*
* Blockchain Networks
* Manage Addon Services \*
* Add New Subgraph \*
\* Available only after the node is up and running.
***
### Basic Information
On the node dashboard, you will be able to see basic information about the node such as,
* Name
* API Key
* Creation Date
* Deployment Date
* Status
* Number of subgraphs created
* Machine configuration
* Blockchain Networks and their RPC and Substream Endpoints
# Deploy Graph Node
This section will guide you on how to deploy your Dedicated Graph Node.
You need first to have a subscription to deploy a node.
**Step 1: Register/Login** - Create a new account or log in to your existing account on the [Traceye Platform](https://app.traceye.io/account/login).
**Step 2: Graph Nodes** - Navigate to the [Graph Nodes](https://app.traceye.io/subgraph/graph-node) page on the platform. Here you will see a list of nodes that you purchased and can be deployed. Click the **Deploy** button on the node card that you want to deploy.
**Step 3: Basic Details** - Provide a name for your node. Then, proceed further by clicking on the **Next** button.
**Step 4: Addons** - Enable the addons you want on your node. The addons that you have purchased can only be enabled. Then, proceed further by clicking on the **Next** button.
**Step 5: Blockchain Networks** - Add desired blockchain networks on your node by providing their names and respective RPC , Substream endpoints. Finally, initiate deploying your node by clicking on the **Submit** button. You can see your node on the [Graph Nodes](https://app.traceye.io/subgraph/graph-node) page as initiated.
{% hint style="warning" %}
The RPC endpoint should be able to request archive data.
{% endhint %}
{% hint style="info" %}
Refer [Substream Endpoints](https://docs.substreams.dev/reference-material/chains-and-endpoints) & [Token Generation](https://docs.substreams.dev/reference-material/substreams-cli/authentication).
{% endhint %}
You can provide RPC endpoint, Substream endpoint, or both. If you provide a Substream endpoint, **Substream-powered subgraphs** will be supported. If not, you can deploy a **Standard subgraphs**.
# View Analytics
Analytics are shown after the node is up and running. The Analytics and Monitoring feature allows you to access multiple reports in various formats, such as graphs, pie charts, and more. Additionally, you can verify CPU utilization, RAM utilization, Storage utilization, alerts, and many more.
To view a specific analytics dashboard, go to the Node Dashboard page and click the icon next to **Add Subgraph**. Under **ANALYTICS & MONITORING**, select the dashboard you want to access.
# Manage Addon Services
This section will guide you to manage the addon services on your node.
The following services are being offered for your node,
1. [Webhooks](#webhooks)
2. [Index Data Pruning](#index-data-pruning)
3. [Ledger Data Pruning](#ledger-data-pruning)
4. [Analytics & BI Tool](#analytics-and-bi-tool)
***
### Webhooks
The Webhooks service is an innovative feature on our platform that allows you to subscribe to specific entities within a subgraph. This functionality ensures you receive data in near real-time, directly to your system, whenever any data related to your subscribed entities is added or modified.
{% hint style="warning" %}
You will need a subscription for the Webhook addon to enable it on a node.
{% endhint %}
{% hint style="info" %}
The Webhook addon will be associated with one node on which you enable the service.
You have the flexibility to create multiple webhooks across various entities within any subgraph hosted on the node.
{% endhint %}
#### Enabling the Webhooks service
{% hint style="info" %}
Activating the Webhook addon will enable Webhooks service and consume one Webhook addon from your subscription.
{% endhint %}
There are two ways to enable the service, the first is to enable it while deploying the node, and the other is to enable it after the node is deployed from the node dashboard page.
**Method 1: While deploying node**
Enable the checkbox against **Webhook** on the Addons tab while you deploy your node.
**Method 2: After the node is deployed**
**Step 1:** Visit the dashboard for the node you wish to activate Webhooks. Then, navigate to the Addons section and expand it. Now, click on the **Webhook** **Addon** **Activate** button to initiate activation of the service.
**Step 2:** On the modal asking confirmation to enable the addon, click on the **Yes** button.
This will initiate the process to enable the webhooks service on the node. While the webhooks are being enabled, you will see that it is under process.
Once the service is enabled you will be notified via in-app notification and see this on the dashboard.
{% hint style="info" %}
**More Details:** [Webhook Management](/services/dedicated-indexing/graph-nodes/subgraph-manual/webhook-management)
{% endhint %}
#### Disabling the Webhooks service
{% hint style="danger" %}
Disabling the Webhooks service will delete all the webhooks on all the subgraphs created within that particular node. This process is irreversible, so proceed with caution.
{% endhint %}
{% hint style="info" %}
Deactivating the Webhook addon will disable Webhooks service and free one Webhook addon from your subscription.
{% endhint %}
**Step 1:** Visit the dashboard for the node you wish to deactivate Webhooks. Then, navigate to the Addons section and expand it. Now, click on the **Webhook** **Addon** **Deactivate** button to initiate deactivation of the service.
**Step 2:** On the modal asking for confirmation to disable the addon, click on the **Yes** button.
This will initiate the process to disable the service on the node. While the webhooks are being disabled, you will see that it is under process.
Once the service is disabled you will be notified via in-app notification.
***
### Index Data Pruning
The Index Data Pruning service introduces a cutting-edge functionality to our platform, enabling users to retain only the latest data for their subgraph entities by setting desired history blocks. This streamlining significantly accelerates the performance of GraphQL queries, offering a more efficient and responsive experience.
{% hint style="warning" %}
You will need a subscription for the Storage & Query Optimizer addon to enable it on a node.
It will be associated with one node on which you enable the service.
{% endhint %}
#### Enabling the Index Data Pruning service
{% hint style="info" %}
Activating the Storage & Query Optimizer addon will enable Index Data Pruning service and consume one Storage & Query Optimizer addon from your subscription.
{% endhint %}
There are two ways to enable the service, the first is to enable it while deploying the node, and the other is to enable it after the node is deployed from the node dashboard page.
**Method 1: While deploying node**
Enable the checkbox against **Storage & Query Optimizer** on the Addons tab while you deploy your node.
**Method 2: After the node is deployed**
**Step 1:** Visit the dashboard for the node you wish to activate Index Data Pruning. Then, navigate to the Addons section and expand it. Now, click on the **Storage & Query Optimizer** **Addon** **Activate** button to initiate activation of the service.
**Step 2:** On the modal asking confirmation to enable the addon, click on the **Yes** button.
This will enable the Index Data Pruning service on the node.
{% hint style="info" %}
**More Details:** [Index Data Pruning](/services/dedicated-indexing/graph-nodes/subgraph-manual/index-data-pruning)
{% endhint %}
#### Disabling the Index Data Pruning service
{% hint style="warning" %}
Before you proceed to disable the Index Data Pruning service, it's crucial to verify that there are no subgraphs actively being pruned. If any subgraph is undergoing pruning, please deconfigure the pruning process within that subgraph first.
{% endhint %}
{% hint style="info" %}
Deactivating the Storage & Query Optimizer addon will disable Index Data Pruning service and free one Storage & Query Optimizer addon from your subscription.
{% endhint %}
**Step 1:** Visit the dashboard for the node you wish to deactivate Index Data Pruning. Then, navigate to the Addons section and expand it. Now, click on the **Storage & Query Optimizer** **Addon** **Deactivate** button to initiate deactivation of the service.
**Step 2:** On the modal asking for confirmation to disable the addon, click on the **Yes** button.
This will disable the Index Data Pruning service on the node.
***
### Ledger Data Pruning
The Ledger Data Pruning service introduces a cutting-edge functionality to our platform, enabling users to retain only the latest chain data by setting desired history blocks.
{% hint style="warning" %}
You will need a subscription for the Storage & Query Optimizer addon to enable it on a node.
It will be associated with one node on which you enable the service.
{% endhint %}
#### Enabling the Ledger Data Pruning service
{% hint style="info" %}
Activating the Storage & Query Optimizer addon will enable Ledger Data Pruning service and consume one Storage & Query Optimizer addon from your subscription.
{% endhint %}
There are two ways to enable the service, the first is to enable it while deploying the node, and the other is to enable it after the node is deployed from the node dashboard page.
**Method 1: While deploying node**
Enable the checkbox against **Storage & Query Optimizer** on the Addons tab while you deploy your node.
**Method 2: After the node is deployed**
**Step 1:** Visit the dashboard for the node you wish to activate Ledger Data Pruning. Then, navigate to the Addons section and expand it. Now, click on the **Storage & Query Optimizer** **Addon** **Activate** button to initiate activation of the service.
**Step 2:** On the modal asking confirmation to enable the addon, click on the **Yes** button.
This will enable the Ledger Data Pruning service on the node.
{% hint style="info" %}
**More Details:** [Ledger Data Pruning](/services/dedicated-indexing/graph-nodes/graph-node-manual/ledger-data-pruning)
{% endhint %}
#### Disabling the Ledger Data Pruning service
{% hint style="info" %}
Deactivating the Storage & Query Optimizer addon will disable Ledger Data Pruning service and free one Storage & Query Optimizer addon from your subscription.
{% endhint %}
**Step 1:** Visit the dashboard for the node you wish to deactivate Ledger Data Pruning. Then, navigate to the Addons section and expand it. Now, click on the **Storage & Query Optimizer** **Addon** **Deactivate** button to initiate deactivation of the service.
**Step 2:** On the modal asking for confirmation to disable the addon, click on the **Yes** button.
This will disable the Ledger Data Pruning service on the node.
***
### Analytics & BI Tool
The Analytics & BI tool in Traceye is another no-code analytics and visualization tool through which users can make subgraph's indexed data easy-to-analyze via charts, graphs, or tables.
{% hint style="warning" %}
You will need a subscription for the Analytics & BI Tool addon to enable it on a node.
It will be associated with one node on which you enable the service.
{% endhint %}
#### Enabling the Analytics & BI Tool service
{% hint style="info" %}
Activating the Analytics & BI Tool addon will enable Analytics & BI Tool service and consume one Analytics & BI Tool addon from your subscription.
{% endhint %}
There are two ways to enable the addon, the first is to enable it while deploying the node, and the other is to enable it after the node is deployed from the node dashboard page.
**Method 1: While deploying node**
Enable the checkbox against **Analytics & BI Tool** on the Addons tab while you deploy your node.
**Method 2: After the node is deployed**
**Step 1:** Visit the dashboard for the node you wish to activate Analytics & BI Tool. Then, navigate to the Addons section and expand it. Now, click on the **Analytics & BI Tool** **Addon** **Activate** button to initiate activation of the service.
**Step 2:** On the modal asking confirmation to enable the addon, click on the **Yes** button.
This will enable the Analytics & BI Tool service on the node.
#### Disabling the **Analytics & BI Tool** service
{% hint style="info" %}
Deactivating the Analytics & BI Tool addon will disable Analytics & BI Tool service and free one Analytics & BI Tool addon from your subscription.
{% endhint %}
**Step 1:** Visit the dashboard for the node you wish to deactivate Analytics & BI Tool. Then, navigate to the Addons section and expand it. Now, click on the **Analytics & BI Tool** **Addon** **Deactivate** button to initiate deactivation of the service.
**Step 2:** On the modal asking for confirmation to disable the addon, click on the **Yes** button.
This will disable the Analytics & BI Tool service on the node.
# Ledger Data Pruning
The **Ledger Data Pruning** introduces a cutting-edge functionality to our platform, enabling users to retain only the latest chain data by setting desired History Blocks.
Cron run every month which will remove chain data based on the History Blocks of each chain.
{% hint style="danger" %}
While pruning, chain cache data also remove , it may slow down the subgraph indexing of respective chain.
{% endhint %}
## Manage Ledger Data Pruning On Node
**Step 1:** Purchase **Ledger Data Pruning** addons by navigating to [Graph Nodes Purchase](https://app.traceye.io/subgraph/graph-node/purchase).
{% hint style="info" %}
Refer [Purchase Subscription](/services/dedicated-indexing/graph-nodes/quick-start-guide/purchase-subscription) page for more details.
{% endhint %}
**Step 2:** To enable the **Storage & Query Optimizer** addon service, navigate to the specific node where it needs to be enabled.
{% hint style="info" %}
Refer [Manage Addon Services](/services/dedicated-indexing/graph-nodes/graph-node-manual/manage-addon-services) page for more details.
{% endhint %}
**Step 3:** Select a node to navigate to its details page. In this page ledger data pruning can be configured on desired chain.
### Configure Pruning
To configure ledger data pruning for a chain, follow these steps:
1. Click the **Configure** button, a modal window will appear.
2. Set desired **History Blocks**. ( The minimum value must be set at 500, while the maximum value should align with the latest block of the subgraph. )
3. Click the **Confirm** button to configure ledger data pruning, or click **Close** button to dismiss the modal without making changes.
### Deconfigure Pruning
To deconfigure ledger data pruning for a chain, follow these steps:
1. Click on the **Configure** **Icon** of desired chain, a modal window will appear.
2. Click on the **Delete Icon**, this will deconfigure ledger data pruning on the chain.
# Subgraph Manual
# Manage Subgraph
This section will guide you on how to manage a subgraph.
* [Create Subgraph](#create-subgraph)
* [Deploy Subgraph](#deploy-subgraph)
* [Query Subgraph](#query-subgraph)
* [Delete Subgraph](#delete-subgraph)
***
### Create Subgraph
{% hint style="warning" %}
The node needs to be in the live state for you to add a subgraph to it.
{% endhint %}
**Step 1: Graph Nodes** - Navigate to the [Graph Nodes](https://app.traceye.io/subgraph/graph-node) page on the platform. Here you will see a list of nodes that you purchased and the ones that are already deployed. Now, click on the **Add Subgraph** button.
**Step 2: Create Subgraph -** Choose the **Create New** option from the dropdown menu.
**Step 3: Enter Details -** Provide a name, and choose the node and the network for your subgraph. Now, click on the **Add** button to create a new subgraph.\
NOTE: If only one node is live then it will be pre-selected. Also, if a single network is present in the node then it will also be pre-selected.
On successful creation, you will be redirected to the subgraph detail page.
***
### Deploy Subgraph
**Step 1:** Navigate to the **Details** section on the subgraph detail page. Now, click on the **Deployment Command** button.
**Step 2:** Follow the steps provided on the screen to deploy your own subgraph.
***
### Query Subgraph
{% hint style="warning" %}
The subgraph must be deployed and indexed before it can be queried.
{% endhint %}
On the subgraph detail page, navigate to the **Query URL** section. Click on first icon to open the **GraphiQL** query editor on a new tab, or click on second icon to copy the query URL.
***
### Delete Subgraph
On the subgraph detail page, click on the **Delete** button on the top right corner of the screen.
Now, click on the **Continue** button to delete the subgraph.
# Webhook Management
{% hint style="warning" %}
The Webhook addon service needs to be enabled on the node for you to use webhooks.
Follow the guide to manage the Webhook addon service [here](/services/dedicated-indexing/graph-nodes/graph-node-manual/manage-addon-services).
{% endhint %}
{% hint style="warning" %}
Webhook management is only possible for deployed subgraphs.
{% endhint %}
This section will guide you on how to manage your webhooks.
* [Create Webhook](#create-webhook)
* [Update Webhook](#update-webhook)
* [Undelivered Records](#undelivered-records)
* [Delete Webhook](#delete-webhook)
### Handle Incoming Webhook Data
When configuring a webhook, it is imperative that the URL specified is capable of handling **POST** requests.
**API Request Retry Policy**
When initiating a request to a specified URL, the system will automatically attempt to connect up to three times at 30-minute intervals.
If, after three attempts, the URL remains unreachable, the data will be classified as an **undelivered record.**
Sample data payload that will be sent to the provided URL.
```json
{
"data": [
{
"id": "\\x1af00600",
"vid": 50,
"hour": 454682,
"block$": 56200,
"protocol": "\\x4200000000000000000000000000000000000010",
"timestamp": 1636856051,
"block_number": 56200,
"cumulative_transaction_count": 1621,
"cumulative_transfer_in_count": 1440,
...
},
{
...
},
{
...
}
]
}
```
***
### Create Webhook
On the subgraph detail page, navigate to the **Webhooks** section. Now, click on the **'+**' icon.
In the window that appears, choose the entities for whom you want to enable webhooks. Then, type in the URL of the location where you want the data for these entities to be sent.
Now, click the **Create** button to create webhooks for the selected entities.
***
### Update Webhook
On the subgraph detail page, navigate to the **Webhooks** section.
Now, click the **View Details** button next to the entity you want to update.
On the window that appears, click the **Edit** button.
Update the required fields and then click on the **Update** button for the changes to take place.
***
### Undelivered Records
On the subgraph detail page, navigate to the **Webhooks** section. Then, click the **View Details** button next to the entity you want to check for undelivered records.
On the window that appears, navigate to the **Undelivered Records** section.
In case, there are no undelivered records, the following message will be displayed.
If undelivered records are present then you can access them and try again to get them delivered by clicking on the **Try Again** button.
***
### Delete Webhook
On the subgraph detail page, navigate to the **Webhooks** section. Now, click the **Delete** button against the entity for whom you want to delete the webhook and stop receiving updates.
Now, click on the **Delete** button to delete the webhook.
**NOTE:** In case you want to remove all webhooks from the subgraph, click the **Delete All** button at the top right.
Now, click the **Delete** button to delete all the webhooks.
# Index Data Pruning
Subgraphs, by default, store a full version history for entities, allowing consumers to query the subgraph as of any historical block. **Index Data Pruning** is an operation that deletes entity versions from a subgraph older than a certain block, so it is no longer possible to query the subgraph as of prior blocks. In GraphQL, those are only queries with a constraint `block { number: } }` or a similar constraint by block hash where `n` is before the block to which the subgraph is pruned. Queries that are run at a block height greater than that are not affected by pruning, and there is no difference between running these queries against an unpruned and a pruned subgraph.
**History Blocks** setting which is used to periodically check whether the subgraph has accumulated more history than that. Whenever the subgraph does contain more history than that, the subgraph is automatically repruned. Repruning is performed whenever the subgraph has more than `History Blocks * 1.8` blocks of history.
## Manage Index Data Pruning On Subgraph
**Step 1:** Purchase **Index Data Pruning** addons by navigating to [Graph Nodes Purchase](https://app.traceye.io/subgraph/graph-node/purchase).
{% hint style="info" %}
Refer [Purchase Subscription](/services/dedicated-indexing/graph-nodes/quick-start-guide/purchase-subscription) page for more details.
{% endhint %}
**Step 2:** To enable the **Storage & Query Optimizer** addon service, navigate to the specific node where it needs to be enabled.
{% hint style="info" %}
Refer [Manage Addon Services](/services/dedicated-indexing/graph-nodes/graph-node-manual/manage-addon-services) page for more details.
{% endhint %}
**Step 3:** Select a subgraph to navigate to its details page, then click on the **Index Data Pruning** tab. This section display **Index Data Pruning** configuration for the respective subgraph.
### Configure Pruning
{% hint style="warning" %}
Before configuring index pruning, ensure the subgraph is deployed.
{% endhint %}
To configure index data pruning for a subgraph, follow these steps:
1. Click the **Configure Pruning** button, a modal window will appear.
2. Set desired **History Blocks**. ( The minimum value must be set at 500, while the maximum value should align with the current block of the subgraph. )
3. To prune once, select the **Prune Once** checkbox (Repruning will not occur); otherwise, leave it unselected.
4. Click the **Confirm** button to configure index data pruning, or click **Close** button to dismiss the modal without making changes.
This will initiate the process to configure index data pruning on the subgraph.
Once the index data pruning is configured you will be notified via in-app notification and see this on the dashboard.
### Deconfigure Pruning
To deconfigure index data pruning for a subgraph, follow these steps:
1. Click the **Deconfigure** button, a modal window will appear.
2. Click the **Yes** button to deconfigure index data pruning, or click **No** button to dismiss the modal.
# Settings
## Manage Settings
**Step 1: Register/Login** - Create a new account or log in to your existing account on the[ ](https://app.zeeve.io/auth/signup)[Traceye Platform](https://app.traceye.io/account/login).
**Step 2: Navigate to Graph Nodes** - Click on the **Graph Nodes** in the **DEDICATED INDEXING** section on the left navigation panel.
**Step 3:** You will be redirected to the [Graph Nodes](https://app.traceye.io/subgraph/graph-node) screen to view a list of all existing nodes and their respective subgraphs.
**Step 4:** Select a subgraph to navigate to its details page, then click on the **Settings** tab. This section displays all your configured settings.
Step 5: To apply new settings, adjust them as needed and then click **Save** Button to confirm your changes.
## Setting Types
### Notifications
Subgraph notifications are a pivotal feature for users who rely on subgraph data for their applications or analyses. These notifications are designed to inform users about significant changes and milestones in the lifecycle of a subgraph, enhancing the overall user experience by ensuring critical updates are timely communicated. Here are the main scenarios where notifications are triggered:
#### Subgraph Status
Notifications are sent out once the status of a subgraph changes to 'Healthy', 'Unhealthy', or 'Failed'. This feature is crucial for maintaining the reliability and performance of applications that depend on subgraph data.
#### Completely Synced
Notifications are sent out once a subgraph has fully synced with the blockchain. This ensures that users are aware of when the data from a subgraph is up to date and reflects the latest state of the blockchain.\_
#### Query Ready
Notifications are sent out once the subgraph are ready to be queried, ensuring that they can leverage the latest data and information immediately.
Implementing these notifications helps users monitor their subgraphs effectively, reducing the need for manual checks and enabling more efficient management of their applications or data analyses.
{% hint style="info" %}
You will receive notifications both in-app and via email.
{% endhint %}
# Substreams-Powered Subgraphs
{% hint style="danger" %}
An internet connection is required for generating Rust bindings.
{% endhint %}
1. Direct Download
```sh
LINK=$(curl -s https://api.github.com/repos/bufbuild/buf/releases/latest | \
awk "/download.url.*buf-Linux-$(uname -m)\"/ {print \$2}" | sed 's/"//g')
echo Downloading $LINK
curl -L $LINK -o /usr/bin/buf
```
2. Using npm
```sh
npm install @bufbuild/buf
```
#### Rust
A complete Rust environment is necessary for developing Substreams modules.
```sh
curl --proto '=https' --tlsv1.2 -sSf https://sh.rustup.rs | sh
source $HOME/.cargo/env
```
### Create Substreams-Powered Subgraphs
There are two methods of creating Substreams-Powered Subgraphs:
1. **Using Substreams** [**triggers**](https://thegraph.com/docs/en/sps/triggers/): Consume from any Substreams module by importing the Protobuf model through a Subgraph handler and move all your logic into a Subgraph. This method creates the Subgraph entities directly in the Subgraph.
2. **Using** [**Entity Changes**](https://docs.substreams.dev/how-to-guides/sinks/subgraph/graph-out): By writing more of the logic into Substreams, you can consume the module’s output directly into Subgraph. In Subgraph you can use the Substreams data to create your Subgraph entities.
You can choose where to place your logic, either in the Subgraph or Substreams. However, consider what aligns with your data needs, as Substreams has a parallelized model, and triggers are consumed linearly.
### Deploy Substreams-Powered Subgraphs
{% hint style="danger" %}
Before deploying a substream-powered subgraph, ensure substream are enabled for the blockchain network in Graph Node.
{% endhint %}
1. Add Rust Target
```sh
rustup target add wasm32-unknown-unknown
```
2. Generate Protobuf Types
```sh
substreams protogen
```
This command generates types in /src/pb.
3. Build Substreams
```sh
substreams build
```
This command creates a Substream package (`.spkg`), which can be used as a data source for a subgraph to access pre-indexed blockchain data streams.
4. Generate Subgraph Project
```sh
substreams codegen subgraph
```
5. Navigate to the Subgraph Directory
Edit the following files as needed:
* mappings.ts
* schema.graphql
* subgraph.yaml
6. Install Dependencies
```sh
npm install
```
7. Generate AssemblyScript & Protobuf Bindings
```sh
npm run generate
```
8. Build Subgraph
```sh
npm run build
```
The final step is to deploy the subgraph using the deployment command. See [Manage Subgraph](/services/dedicated-indexing/graph-nodes/subgraph-manual/manage-subgraph)
# Subquery Nodes
# Quick Start Guide
# Purchase Subscription
Follow these steps to purchase a subscription:
**Step1: Register/Login** - Create a new account or log in to the existing account on the [Traceye Platform](https://app.traceye.io/account/login)
**Step 2: Navigate to Purchase Page -** Navigate to the [Subquery Nodes](https://app.traceye.io/subgraph/subquery/purchase) purchase page by clicking on **Subquery Nodes** present in the **DEDICATED INDEXING** section from the left navigation pane and then clicking on the **Buy Subscription** button at the top.
**Step 3: Enter Quantity** - Provide the number of Nodes and Addons that you want to purchase. Then, click on the **Buy Now** button to proceed.
**Step 4: Make Payment** - On the payment page, enter your card details and click on **Subscribe** to make payment.
### Congratulations :tada: !!! You have successfully purchased your subscription.
# Subquery Node Manual
On the detail page of your node, you will be able to see all the relevant details of your node.
You can access the following on the node page,
* Basic Information
* Analytics Dashboard \*
* Addons And Services \*
* Add New Subquery \*
\* Available only after the node is up and running.
***
### Basic Information
On the node dashboard, you will be able to see basic information about the node such as,
* Name
* API Key
* Creation Date
* Deployment Date
* Status
* Number of subquery project created
* Machine configuration
# Deploy Subquery Node
{% hint style="warning" %}
You need first to have a subscription to deploy a node.
{% endhint %}
**Step 1: Register/Login** - Create a new account or log in to your existing account on the [Traceye Platform](https://app.traceye.io/account/login).
**Step 2: Subquery Nodes** - Navigate to the [Subquery Nodes](https://app.traceye.io/subgraph/subquery) page on the platform. Here you will see a list of nodes that you purchased and can be deployed. Click the **Deploy** button on the node card that you want to deploy.
**Step 3: Basic Details** - Verify the machine configuration and provide a name for your node. Then, proceed further by clicking on the **Next** button.
**Step 4: Addon Services** - Enable the add-on you want on your node. The addons that you have purchased can only be enabled. Finally, initiate deploying your node by clicking on the **Submit** button. You can see your node on the [Subquery Nodes](https://app.traceye.io/subgraph/subquery) page as initiated.
Traceye team will set up your subquery node server and activate it. Once the server is live, you will receive an in-app notification.
# View Analytics
Analytics are shown after the node is up and running. The Analytics and Monitoring feature allows you to access multiple reports in various formats, such as graphs, pie charts, and more. Additionally, you can verify CPU utilization, RAM utilization, Storage utilization, alerts, and many more.
To view a specific analytics dashboard, navigate to the node dashboard page, click on the icon next to **Add Subquery**, Under **ANALYTICS & MONITORING**, choose the dashboard you wish to access.
# Manage Addon Services
The following addon services are being offered for your node,
1. [Analytics & BI Tool](#analytics-and-bi-tool)
***
### Analytics & BI Tool
The Analytics & BI tool in Traceye is another no-code analytics and visualization tool through which users can make subquery's indexed data easy-to-analyze via charts, graphs, or tables.
{% hint style="warning" %}
You will need a subscription of the Traceye BI Tool addon to enable it on a node.
{% endhint %}
{% hint style="info" %}
The Traceye BI Tool addon will be associated with one node on which you enable the service.
{% endhint %}
#### Enabling the Analytics & BI Tool service
{% hint style="info" %}
Enabling the Analytics & BI Tool service will consume one Traceye BI Tool addon from your subscription.
{% endhint %}
There are two ways to enable the addon, the first is to enable it while deploying the node, and the other is to enable it after the node is deployed from the node dashboard page.
**Method 1: While deploying node**
Enable the checkbox against Traceye BI Tool on the Addons tab while you deploy your node.
**Method 2: After the node is deployed**
**Step 1:** Visit the dashboard for the node you wish to configure Analytics & BI Tool for. Then, navigate to the Addons section and expand it. Now, click on the Traceye Bi Tool addon **Activate** button to enable the service.
**Step 2:** On the modal asking confirmation to enable the addon, click on the **Yes** button.
This will enable the service on the node.
**Step 3:** Then click on the icon next to **Add Subquery** and click on the **Traceye BI** to access it.
#### Disabling the Analytics & BI Tool service
{% hint style="info" %}
Disabling the Analytics & BI Tool service will free up a Traceye Bi Tool addon in your subscription.
{% endhint %}
**Step 1:** Visit the dashboard for the node you wish to configure Analytics & BI Tool for. Then, navigate to the Addons section and expand it. Now, click on the Traceye Bi Tool addon **Deactivate** button to disable the service.
**Step 2:** On the modal asking for confirmation to disable the addon, click on the **Yes** button. This will disable the service on the node.
# Subquery Manual
# Manage Subquery
This section will guide you on how to manage a subquery.
* [Create Subquery](#create-subquery)
* [Deploy Subquery](#deploy-subquery)
* [Query Subquery](#query-subquery)
* [Delete Subquery](#delete-subquery)
***
### Create Subquery
{% hint style="warning" %}
The node needs to be in the live state for you to add a subquery to it.
{% endhint %}
**Step 1: Subquery Nodes** - Navigate to the [**Subquery Nodes**](https://app.traceye.io/subgraph/subquery) page on the platform. Here you will see a list of nodes that you purchased and the ones that are already deployed. Now, click on the **Add Subquery** buttons.
**Step 2: Enter Details -** Provide a name, rpc endpoint and choose the node for your subquery. Now, click on the **Add** button to create a new subquery.\
NOTE: If only one node is live then it will be pre-selected.
On successful creation, you will be redirected to the subquery detail page.
***
### Deploy Subquery
**Step 1:** Navigate to the **Details** section on the subquery detail page. Now, click on the **Deployment Command** button.
**Step 2:** Follow the steps provided on the screen to deploy your own subquery.
***
### Query Subquery
{% hint style="warning" %}
The subquery must be deployed and indexed before it can be queried.
{% endhint %}
On the subquery detail page, navigate to the **Query URL** section. Click on **Redirection** icon to open the **GraphiQL** query editor on a new tab, or click on **Copy** icon to copy the query URL.
***
### Delete Subquery
On the subquery detail page, click on the **Delete** button on the top right corner of the screen.
Now, click on the **Continue** button to delete the subquery.
# Settings
## Manage Settings
**Step 1: Register/Login** - Create a new account or log in to your existing account on the[ ](https://app.zeeve.io/auth/signup)[Traceye Platform](https://app.traceye.io/account/login).
**Step 2: Navigate to Subquery Nodes** - Click on the **Subquery Nodes** present in the **DEDICATED INDEXING** section from the left navigation pane.
**Step 3:** You will be redirected to the **Subquery Nodes** screen to view a list of all existing nodes and their respective subquery.
**Step 4:** Select a subquery to navigate to its details page, then click on the **Settings** tab. This section displays all your configured settings.
Step 5: To apply new settings, adjust them as needed and then click **Save** Button to confirm your changes.
## Setting Types
### Notifications
Subquery notifications are a pivotal feature for users who rely on subquery data for their applications or analyses. These notifications are designed to inform users about significant changes and milestones in the lifecycle of a subquery, enhancing the overall user experience by ensuring critical updates are timely communicated. Here are the main scenarios where notifications are triggered:
#### Subquery Status
Notifications are sent out once the status of a subquery changes to 'Healthy', 'Unhealthy', or 'Failed'. This feature is crucial for maintaining the reliability and performance of applications that depend on subquery data.
#### Completely Synced
Notifications are sent out once a subquery has fully synced with the blockchain. This ensures that users are aware of when the data from a subquery is up to date and reflects the latest state of the blockchain.
#### Query Ready
Notifications are sent out once the subquery are ready to be queried, ensuring that they can leverage the latest data and information immediately.
Implementing these notifications helps users monitor their subquery effectively, reducing the need for manual checks and enabling more efficient management of their applications or data analyses.
{% hint style="info" %}
You will receive notifications both in-app and via email.
{% endhint %}